
Why You Need a System
Success in scouting—or in life—comes down to having a system. A system gives you a repeatable process that won’t collapse under pressure. You don’t need to perfect it from day one, but starting with a solid foundation and refining it over time will take you a long way.
I’m always tweaking my approach. Recently, I dove into Cody Rich’s OnX masterclass, and it had such an impact that I began adopting parts of his method into my own. What follows is a comprehensive, Apex-style Target Package system you can apply to any new area. By the end, you’ll know how to identify elk-friendly terrain, organize it inside OnX, and narrow down to huntable spots that fit your style and conditions.
The Target Package Framework
- High-Level Breakdown — Pick the right unit.
- Medium-Level Breakdown — Find Areas of Interest (AOIs) inside that unit.
- Low-Level Breakdown — Drill into huntable spots inside your AOIs.
High-Level Breakdown: Choosing a Unit
At the top level, you’re looking across the state and weighing your options. Start by asking:
- How do I want to hunt?
- Glassing / spot-and-stalk
- Calling elk in
- Still-hunting timber
- Ambush setups on water or travel corridors
- What’s my tag strategy?
- Willing to save points for a premium, once-in-a-decade unit?
- Or do you prefer over-the-counter hunts you can repeat every year or two?
From there, apply Cody’s sliding scale concept:
- Population: Favor stable or increasing herds.
- Access: Enough to reach elk, but not so much that every basin has a trail.
- Pressure: Look for areas where you can escape crowds.
- Point Cost: Great populations and low pressure usually cost more points.
- Non-negotiables: Every unit must provide elk with security, food, and water.
Finally, look at the data:
- Population trends (stable or rising?)
- Tag allocation (increasing or decreasing?)
- Harvest rates (10–20% success is average—if the unit sits there, it’s viable).

Medium-Level Breakdown: Building AOIs
Once you’ve narrowed to a unit, zoom in to identify Areas of Interest (AOIs).
Match AOIs to Your Hunting Style
- Glassing: Prioritize ridge systems, glassing knobs, and open terrain.
- Calling / Still-Hunting: Look for north-facing timber with good access to cover ground.
- Ambush: Key in on water or destination food sources.

Apply Target Parameters
- Edge Habitat: Transitions (timber to meadow, conifer to deciduous, burn to regrowth).
- Face Orientation: North aspects often provide bedding and cooler forage.
- Elevation Bands: Elk move with season/pressure—higher early, lower as snow/crowds build.
- Burn Areas: 3–7 years post-fire are prime; just remember burns also attract hunters.

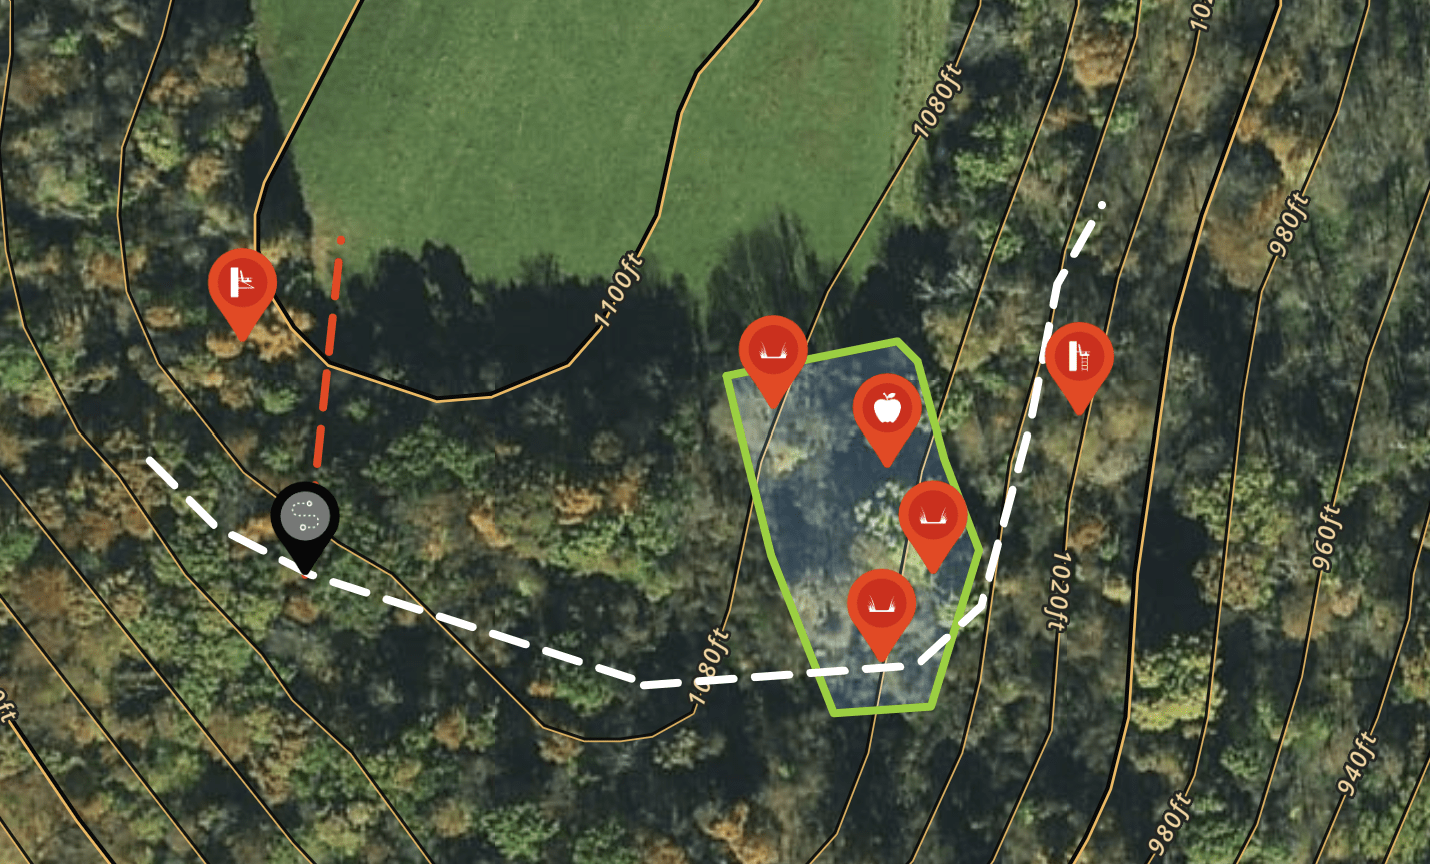
OnX Tools for AOIs
- Radius Tool: Draw practical hunt radiuses around camps or trailheads.
- Area Shape Tool: Outline AOIs like meadows, burn patches, or bedding zones.
- Line Tool: Measure approach routes or routes between AOIs.
- Folders: Keep AOIs grouped by unit or hunt plan.
- Color Coding: Assign colors (green = feeding, blue = water, red = bedding) for quick filters.
Pro Tip: When you highlight AOIs systematically, clusters will appear. These clusters form your core hunt areas. Aim to identify four solid core areas, trimming based on realistic access.
Ask Smarter Questions
When contacting biologists or past tag holders, don’t ask for basins—they’ll just point you to overhunted spots. Instead, ask:
- “What elevation bands are elk in during September?”
- “Which side of the unit do elk favor in October?”
These answers give you broad filters you can apply across the map.
Low-Level Breakdown: The Spot Inside the Spot
Now it’s time to pick huntable spots inside your cores. Use these filters:
- Huntability: Can you effectively hunt it (wind, terrain, cover)?
- Route Efficiency: Can you cover multiple drainages without wasting hours hiking?
- Proximity: Favor clusters of huntable features over isolated honey holes.
- Edge Habitat: Required for every drainage or basin.
- Water/Food: Major factor in arid units; secondary in wetter climates.
- Slope Direction: North is prime, but elk use micro north aspects on east/west slopes.
- Historical Sign: Past sightings, rubs, or bugles are gold. Save them in OnX folders with dated notes.

OnX Slope & Trail Tools
- Use the Slope Angle layer to identify huntable terrain (elk prefer 10–30% grades).
- Check your own limits—know the difference between a grindable climb and a 58% wall.
- Differentiating drivable roads vs. walkable trails prevents wasted days.
Map Organization (4-Folder System)
- AOIs & Core Areas
- Trails & Parking
- Saddles, Benches, Ridges, & Parks
- Historical Sign & Sightings
This keeps your map clean and lets you toggle by layer in the field.
Pulling It Together
By the end of this process, you’ll have:
- Four core hunt areas built from AOI clusters.
- Multiple huntable spots inside each, screened for efficiency, huntability, and elk needs.
- Clean, organized OnX maps that can be toggled for clarity in the field.
This is your Target Package — your digital playbook for the hunt. But remember: maps only get you so far. At some point, you have to step from the screen into the mountains. That’s where the Strike Package comes in — taking everything you’ve mapped and turning it into boots-on-the-ground plans: entry routes, morning and evening setups, fallback options, and daily hunt sequencing.
Think of it this way: The Target Package finds the elk. The Strike Package gets you in front of them.

Leave a Reply